
Ender Gaming Core Admin Panel — Official Website How-To Guide & FAQ
1. Quick Start & Graphical Installation
The Ender Gaming Core Admin Panel features a state-of-the-art graphical installation experience using a custom borderless Setup Wizard. This automates all file placement, shortcut creations, and system configurations.
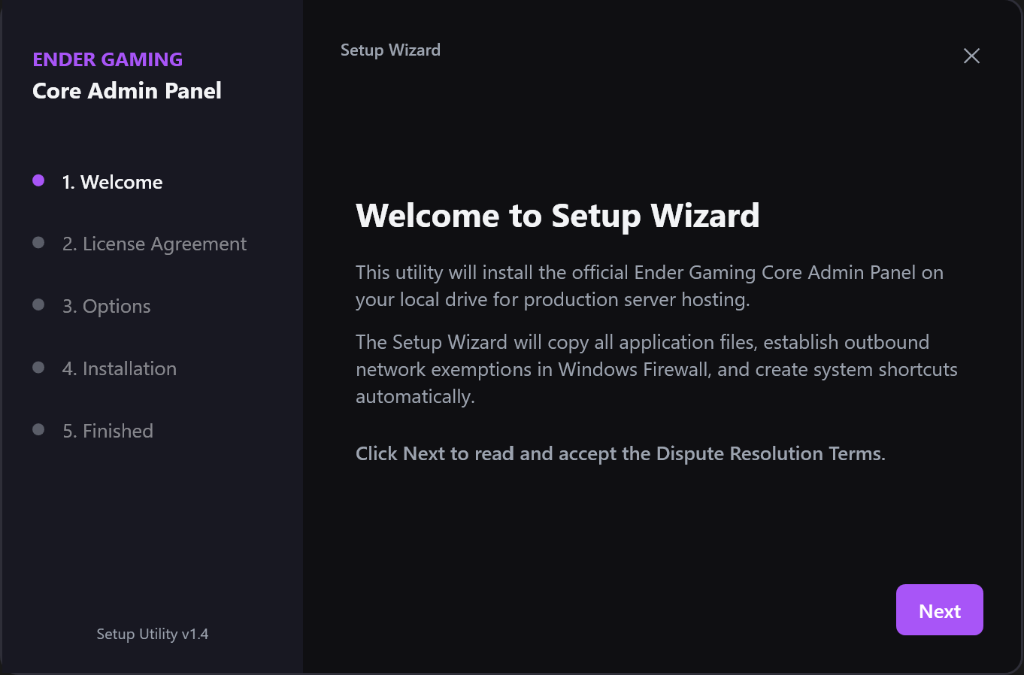
Step 1: Launch the Setup Wizard
- Download the installer file
EnderGamingCoreAdminPanelInstaller.exedirectly from your website user dashboard. - Double-click
EnderGamingCoreAdminPanelInstaller.exeto start the high-fidelity Graphical Setup Wizard.
The Setup Wizard requires Administrator privileges to register network firewall rules and copy files to production paths. It will automatically ask for system permission on startup.
Because this installer is brand new and not yet verified by an expensive Microsoft EV certificate, Windows Defender SmartScreen may temporarily flag it as an "unrecognized app" when you try to open it.
To safely bypass this, click More info on the blue screen, and then click Run anyway to launch the Setup Wizard.
Step 2: License Agreement Acceptance
- The wizard displays the combined Software License & Binding Arbitration Agreement (including End-User License EULA copyright protections, redistribution bans, and reverse-engineering bans) in a scrollable panel.
- To unlock the setup process, read the terms and select: *"I accept the terms of the Agreement"*.
- Click Next.
Step 3: Choose Destination & Shortcut Options
- Destination Folder: By default, the wizard will install the files permanently to the user's C: drive at:
C:\EnderGamingCoreAdminPanel
- If you wish to install to a different directory or custom drive path, click Browse to choose a path using the interactive folder selection dialog.
- Shortcuts: The wizard gives you the option to generate a Desktop Shortcut and a Start Menu Shortcut called "Ender Gaming Core Admin Panel" — these shortcuts will only be generated if you select this option.
- Click Install.
Step 4: Automated Setup & Live Telemetry
The wizard will run asynchronously and display live, visual file-by-file progress as it:- Creates the target directory.
- Extracts and copies all core assemblies, assets, and default configurations.
- Automatically generates the shortcuts (if you selected them in Step 3).
- Registers local Windows Defender Firewall inbound rule exemptions for the panel and standard ports.
Step 5: Launch & Complete
- Once the progress bar reaches 100%, the success screen is displayed.
- Instead of using raw checkbox options, the completion screen features a premium selectable button layout allowing you to click Launch Admin Panel to open the dashboard immediately, or Exit Setup to close the wizard.
Step 6: Clean & Safe Uninstall
If you ever need to remove the application from your computer:- Double-click
EnderGamingCoreAdminPanelUninstaller.exelocated in your installation folder. - Matched Styling: The uninstaller features a custom high-fidelity GUI that perfectly matches the dark-themed glassmorphic styling of the Setup Wizard.
- Firewall Cleanup: It automatically cleans up all associated Windows Defender Firewall inbound rules registered during installation.
- Keep Your Worlds Data: The uninstall process will prompt you if you would like to delete or preserve local program data (like
config.jsonand system logs). Crucially, the installer defaults to preserving all your active world maps, saves, and backup archives, so you never accidentally lose your game progress!
2. Navigating the Ender Gaming Core Admin Panel
The left sidebar provides access to 10 distinct management contexts. Use the global Active Server dropdown at the top of the sidebar to switch between servers. Selecting a server immediately filters the contexts of all views to focus exclusively on that instance.
1. Dashboard
The Dashboard is your main overview for managing multiple servers using a modern card layout.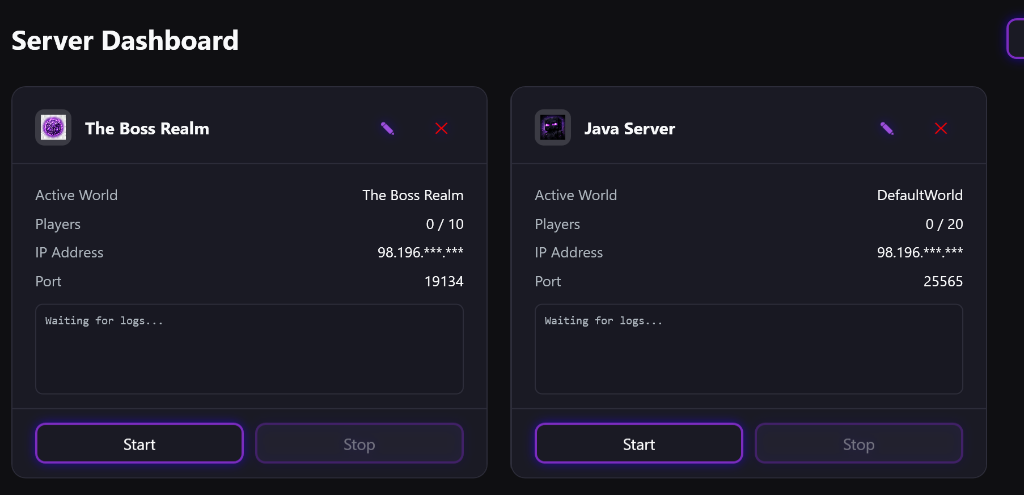
Adding a Server Instance
- Click the dotted ADD NEW SERVER card.
- Input your server configurations:
- Server Name: A friendly identifier (e.g., Survival Realm).
- Edition: Choose either Minecraft Bedrock or Minecraft Java.
- World Name: Enter a seed or world folder name.
- Server Folder Path: Select the local directory containing your game binaries (
bedrock_server.exeorserver.jar). If empty or files are missing, the panel will automatically download pristine, official binaries from Mojang CDNs. - Server Port: Assign a unique port (see port section below).
- World Seed (Optional): Enter a custom generator seed (e.g.,
4598203847293). - Max Players (Optional): Select your server player limit from the dropdown list.
- Minecraft Bedrock:
10,20,30, or40players. - Minecraft Java: Scaled capacities of
20,40,60, or80players.
WARNING: Java Hardware BoundariesUnlike Bedrock, which features a multi-threaded C++ backend, standard Java Dedicated Servers run their entire core game loop (blocks, entity ticking, redstone physics, chunk generations) on a single CPU thread. Therefore, Java capacity boundaries are constrained by physical hardware rather than engine limits:
- 20 Players (Standard/Lightweight): Runs on almost any system; requires ~2–4 GB allocated RAM.
- 40 Players (Mid-Tier): Requires strong CPU single-core IPC and ~4–6 GB allocated RAM. Recommended chunk view distance: 8–10.
- 60 Players (High-Performance): Requires high-end consumer hardware (Ryzen/Core with high single-core clocks), ~6–8 GB RAM, and optimized JVM Garbage Collection settings.
- 80 Players (Ultimate Host Cap): The typical peak threshold for a home system/internet connection. Requires high-IPC dedicated CPU cores, Gigabit fiber upload speeds, and 8–12 GB RAM with customized Garbage Collection arguments (like G1GC parameters).
- Minecraft Bedrock:
- Default Game Mode: Choose Survival or Creative.
- Difficulty Level: Choose from Peaceful, Easy, Normal, Hard, or Hardcore.
- Click Save & Create. The server will appear as a new dynamic status card on your dashboard.
The panel is designed to manage a maximum of 5 concurrent server registrations. This limitation is in place to guarantee optimal host PC stability.
2. Console
The Console provides a real-time, interactive command stream connected directly to your active server process.- Status Highlights: Text colors are dynamically parsed so severities are easy to spot (
[INFO]= Green/White,[WARN]= Yellow,[ERROR]= Red). - Command Injection: Type commands (e.g.,
op username,say server restarting...,stop) into the bottom input box and press Enter to inject them directly into the live process.
3. Players
The Players tab allows you to manage the community of your active server.- Online Players: View a list of currently connected players.
- Access Control: Easily manage the server's Whitelist (allow-list) to restrict access to approved friends.
- Moderation: Ban rule-breaking players or specific IP addresses.
- Admin Rights: Grant Operator (OP) status to give players in-game admin commands.
4. Mods
The Mods tab provides a streamlined interface for expanding your gameplay.- Java Edition: Manage custom plugins (.jar files) if you are running a modified server type like Spigot, Paper, or Fabric.
- Bedrock Edition: Install and manage Addons and Behavior Packs to modify vanilla mechanics.
5. Resources
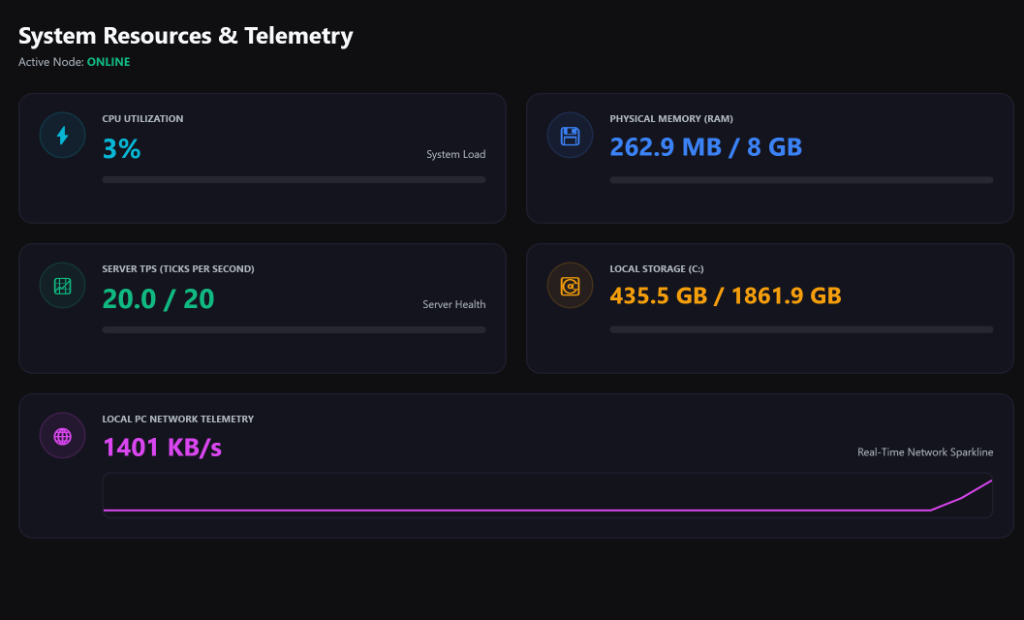
The Resources tab acts as your live performance telemetry monitor.- Live Tracking: Keep informed about how much physical load each server is putting on your machine.
- Metrics: Track CPU usage and RAM allocation in real-time to ensure you do not exceed your PC's hardware limits.
6. Worlds
The Worlds tab gives you complete control over your server's level data.- Active World: View your currently active world folder.
- Import/Export: Import new custom maps or export your world saves effortlessly without digging through file explorer.
- Swapping: Easily switch between multiple different world saves.
7. Backups
Protecting your server progress is fully automated using premium scheduling and compression utilities.- Create Backup: Click this to force a compressed ZIP archive of your world files immediately.
- Restore: To roll back to a previous state, select a backup from the historical list and click Restore.
Before every automated server update, the panel forces a safety backup so you can recover instantly in case of incompatibilities.
8. Updates
The Updates tab handles 1-click upgrades for your server binaries.- The panel compares your local version to the latest releases fetched from official Mojang CDNs.
- Click Update Server to safely download the new files. The smart installer will shut down the server, force a backup, overlay the new binaries while protecting your world/configs, and restart automatically.
9. Settings
The Settings tab is where you configure the core properties of your active server graphically, without needing a text editor.- General: Change the Server Name, MOTD, and Ports.
- Gameplay: Adjust the Difficulty, change the Default Game Mode, or modify Max Players directly. All changes write safely to your
server.properties.
10. Logs
The Logs tab keeps a persistent history of your server's console output.- Diagnostics: Review historical log files to diagnose crashes or plugin errors.
- Exporting: Easily export or copy past logs to share with support forums if you run into configuration issues.
3. Network Configuration & Troubleshooting
Understanding Port Assignments & Reusability
Every active server instance running on the same computer must use a unique port to avoid network conflicts. However, port numbers can be reused if you have deleted an old server instance, or if the server set is completely offline.Default Port Disclosures:
- Minecraft Java Edition Default: Port
25565(TCP). - Minecraft Bedrock Edition Default: Port
19132(IPv4, UDP) and Port19133(IPv6, UDP).
Port Increment Map for Bedrock Servers:
When configuring multiple Bedrock instances that will run concurrently, assign ports starting from the default and incrementing by 2 to prevent conflicts:
- Server 1 (Default): IPv4 Port
19132| IPv6 Port19133 - Server 2: IPv4 Port
19134| IPv6 Port19135 - Server 3: IPv4 Port
19136| IPv6 Port19137 - Server 4: IPv4 Port
19138| IPv6 Port19139 - Server 5: IPv4 Port
19140| IPv6 Port19141
Port Forwarding Guide & Warnings
To allow players to join your server from outside your local home network:- Identify your hosting PC's local IP address (e.g.,
192.168.1.50). - Navigate to your router's administration interface.
ISP-Specific Variations (Xfinity Exception): Traditional routers allow configuration via a web interface (e.g., 192.168.1.1 or 10.0.0.1). However, if you are using an Xfinity gateway, local port forwarding is disabled on the website portal. You MUST open the Xfinity Mobile App, log into your account, and navigate to WiFi > View WiFi Equipment > Advanced Settings > Port Forwarding to set up rules.
- Add a port forwarding rule directing traffic to the hosting PC's local IP:
- For Java: Forward port
25565(Protocol: TCP). - For Bedrock: Forward port
19132and19133(Protocol: UDP).
- For Java: Forward port
- Save the rules.
CONNECTION TIMEOUT WARNING: If these port forwarding rules have not been correctly configured on your router or ISP mobile app, outside players will be completely unable to connect to your server. They will experience instant connection timeouts when attempting to log in.
Windows Defender Firewall Auto-Configuration
Windows Defender Firewall will sometimes block player traffic even when port forwarding is configured correctly on the router.With Ender Gaming Core's Admin Panel, this is handled 100% automatically for you! The graphical Setup Wizard registers inbound rule exemptions for the main application and all game server ports (19132 through 19141) during the installation process, meaning you don't have to configure any firewall rules manually.
Public IP Auto-Masking
For maximum security, your public IP is automatically masked (*.*.***) on the dashboard cards.
- Click Show to reveal the IP.
- Revealing the IP starts a 5-minute security timer. After 5 minutes, the IP automatically masks itself again to prevent visual leaks.
VPN "Backend Connection Failed" Fix
Using a VPN with the panel is fully supported, but active client firewalls (NordVPN, ExpressVPN, Mullvad) may isolate local panel traffic.Allow LAN Access: If you see a Backend Connection Failed warning:
- Open your VPN software settings.
- Enable the Allow Local Network Sharing / LAN Access setting.
- Restart the Admin Panel. Connection will be instantly restored!
4. Frequently Asked Questions (FAQ)
Q: Does my PC need to stay on for others to connect?
A: Yes. Because Ender Gaming Core Admin Panel hosts the servers directly on your machine, your PC must remain powered on, awake, and connected to the internet for players to join. If your PC goes to sleep or is turned off, your servers will immediately go offline.Q: Where are my server configuration files stored?
A: The panel's own settings and your list of registered servers are kept inside theconfig.json file in the main folder of the Ender Gaming Core Admin Panel. You can copy this file if you wish to back up your panel registrations.
server.properties!
config.json is strictly for the panel's interface data. Individual game settings (like MOTD, difficulty, and max-players) are still securely saved inside each respective server's server.properties file located in their server folders.
Q: Why does my Java server say "Java Server Update Failed"?
A: Ensure your Java installation path is configured correctly in Settings. If you have multiple Java runtimes installed, specify the target version in the properties to avoid conflict.Q: Can I run both Bedrock and Java servers at the same time?
A: Yes! As long as each server is configured to use a unique port, they are fully isolated and can run concurrently on the same machine without interfering.Q: How do I transfer my settings to a new PC?
A: Simply copy the entireEnderGamingCoreAdminPanel folder containing EnderCoreAdminPanel.exe and config.json to a flash drive, transfer it to the new PC, and run it. Ensure your server paths remain identical or update them in the Settings view on the new machine.